
A Shaker With A New Twist
By: Tony Morrison
Photos By: Anthony Morrison
For the Dodge Truck owner that wants to grab some of the old nostalgia of the Hemi days and grab some additional air for their engine’s performance, there’s a hood that resembles the Classic Shaker design. Keystone Restyling in Columbus, Ohio manufactures a fully functional DODGE RAM HEMI SHAKER HOOD just like the shaker hoods that donned the Mopar cars of the 70’s. Made for the ‘03 and up Dodge Ram trucks with the 5.7 Hemi engine, this hood is sure to turn heads. Who can forget the shaker section sticking up through the hood, and shook when the engine was let loose.
Anticipation for the hood has definitely caused some excitement for Dodge Ram owners who love the look of the Classic Mopars. The company says that the hood is fully functional and simple to install. We wanted to see how the hood fit onto our project Ram and we were able to work with Keystone with its development. Keystone was responsive to any problems or questions that we encountered with its first hood out of the fiberglass mold. Working together, we made some changes that will make the install experience a lot easier, from the instructions, to the parts included.
The DODGE RAM HEMI SHAKER HOOD comes with an AIRAID Quick-Fit air box and hardware, to provide a functional Ram Air system. The product was delivered, and all pieces were accounted for. We took the hood to Royce Payton and the boys at Custom Design Paint and Body Works in Fort Collins CO for the paint and prep.
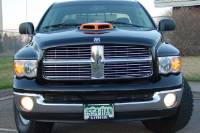
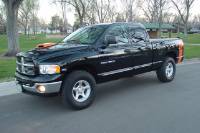
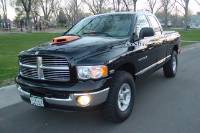
The truck that this is to be installed on is a 2003 Dodge Ram 1500 Quad Cab Laramie, with the Off Road Package. The truck is black with orange bed stripes, so we are going to be painting the hood black, and the Shaker section orange to help set off the rest of the truck.
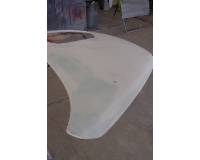
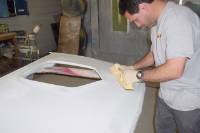
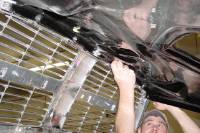
The first thing that needs to be done is to test fit the hood to the truck. This will make sure there will be no problems down the road. During inspection of the hood and Shaker scoop, we found some small waves in the hood, that Custom Design reworked. To solve this problem, Custom Design sanded the hood down, and added a coat of primer. After this, the hood was very smooth. On hoods that will be painted dark colors, especially black, the waves would really show up, therefore it is imperative that the hood be smoothed over to ensure a mirror-like finish. The Shaker section however, was flawless. After the hood was smoothed out, the two pieces were shot with primer, awaiting the black and orange paint.
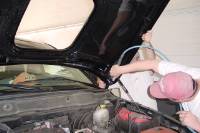
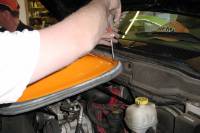
While that was being done at Custom Design, we installed the AIRAID Quick fit to the project truck. This is done by removing the stock air box lid, and the filter. Our project truck had another aftermarket filter and intake box which performed well but didn’t work with our new Keystone hood. Once the lid and the filter were removed, we installed the AIRAID Quick Fit intake to the stock box. It hooks up to the filter box like the stock lid, and uses all the clips and flanges. The existing tube was used to connect the throttle body to the new AIRAID filter.
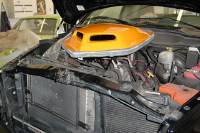
To install the new Shaker hood you would need to remove the stock air hat, or the piece on the engine that has HEMI 5.7 written on it. The Shaker hood brackets will connect to the same place the stock air hat connects to the engine. The connection of the existing tube to the AIRAID Quick Fit box was tight, but that gave us no chance for leaks. It looks impressive in the engine compartment.
Back at Custom Design, the hood was sprayed black. First the underside was done, and Custom Design even left the Original Keystone hood tag on it, covered it, and it looks totally stock. The black really shines. Once dry, the top was shot, sanded, polished. The same process was done on the Shaker section with orange, only the inside of the shaker was painted flat black. Both pieces were immaculate.
Once the hood and Shaker scoop was dry, it was time to remove the stock hood, and grille, that will be bolted into place on the new hood. This was done by first removing the screws holding the hood to the truck. On the project truck, the Grille also had two way 3M tape holding the Grille to the hood. The hood had to be gently pulled apart. Be careful not to try to yank the Grille off, as you might damage the grille. The hardware for the latch was also removed.
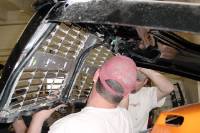
The new hood was bolted onto the stock arms. We attached the Shaker section brackets to the engine. This holds the scoop in place and allows it to “shake” when the engine is revved. Once the brackets are installed, we can set up the Shaker bottom half. Nuts were placed halfway down the top bolts on the bracket (four of them), and the bottom of the shaker was installed.
We placed the top of the Shaker scoop on and slowly closed the hood to check for fitment. We also made sure it was centered in the hood opening. Once it was centered, then we put the four bolts on top of the bottom sections, and tightened them to secure the bottom half of the Shaker to the bracket.
The clips for the screws to hold both sections of the Shaker scoop together, were added to the bottom section where all the screw holes were located. Keystone already had all the holes for the screws, and the drains are pre-drilled.
We installed the weather stripping that was included in the kit to the bottom half of the Shaker scoop. This is to seal the air and water out of the engine compartment. Once the rubber seal was installed, the top section of the shaker was lowered into place. The screws were placed in the screw holes, and tightened to secure the top and bottom Shaker section. We slowly closed the hood, to make sure we still were good with the placement, and the seal was not pushing on the hood.
At this point, we found that the AIRAID Quick Fit ram air kit was a little too tall for the hood, and we had to cut some of the top of the ram air box off. We talked with Keystone about this, and they have already made adjustments to the hood so this will not have to be done with current production hoods.
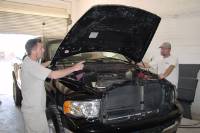
Once the Shaker and the ram-air intake was installed and set, the Grille pieces and latch were re-assembled. We slowly lowered the hood again to make sure all items were matching up. Once everything was in place, we closed the hood to assure proper fit. We started the truck, and could immediately tell a different note to the engine. The air flows into the Shaker openings, through the ductwork in the hood, to the filter, allowing additional colder air, into the engine. More horsepower, better throttle response, and just a plain, mean look are provided from a Ram Air hood like this! The Custom Design team did an excellent job with the paint and the installation of the hood.
We took the truck out on the street where we received immediate reactions from people looking and giving the thumbs up when we drove by. When we got onto the freeway, we opened it up, and WOW, the response was incredible. The throttle response was noticeably quicker and the truck had a lower tone, and you could hear the air being sucked into the new AIRAID filter.
So for all you old Mopar buffs out there that want to bring some of the old Mopar history back to your truck, or if you just want a mean look for your Dodge Ram, then the Keystone Restyling Shaker hood is for you. It will set your truck apart from the others.
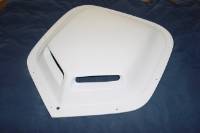
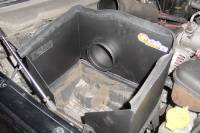
Here’s the top shaker section sent from Keystone Restyling.
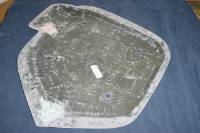
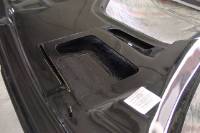
The bottom section of the shaker, looking at the inside.
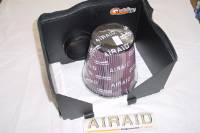
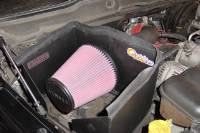
The Airaid Quick-Fit airbox and filter to make the shaker and hood a true Ram Air hood.
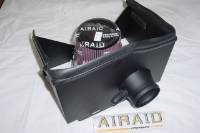
The outside of the Airaid Quick-Fit box, showing the connection for the tube that goes to the throttle body.
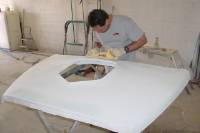
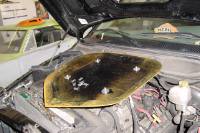
The hood that was shipped from Keystone Restyling, with the members of Custom Design Paint and Body Works working to smooth the small waves.
Some filler was added to build up the hood, then sanded down to smooth.
Great care was taken to make the hood smooth.
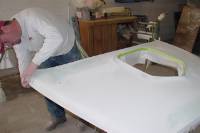
The hood is masked for the primer.
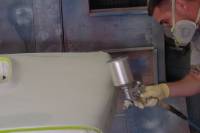
The hood is shot in primer, doing small sections at a time.
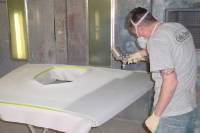
Care was taken to do one even stroke per pass. This makes a nice even coat.
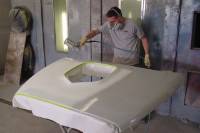
The painter works around the outside of the hood, inward.
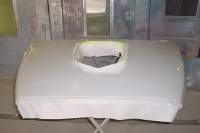
The primered hood, left to dry on the rack.

The painting was done in the same caring way, and the finished product looks great. You’ll agree, this is much better looking than the stock hoods underside.
Here is the duct that takes the air from the shaker section, goes into the hood, and the air exits over the Airaid Quick-Fit box.
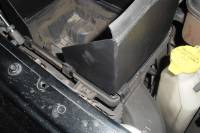
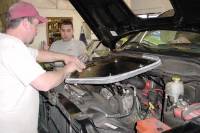
The first part of the install is to take the grille off of the stock hood. This grille will be added to the new hood.
Once the grill was removed, the hood was unbolted from the hood supports.
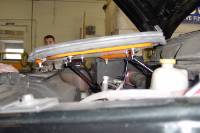
The new shaker hood was installed on the hood supports. All hardware used on the original hood was used to attach the new hood.

Once the new hood was installed, it was time to install the Airaid Quick-Fit airbox and filter. This is the stock airbox on the 5.7 Hemi.
With the stock airbox lid and filter removed, we attach the new Airaid lid on the Stock box. This will make the hood a true Ram Air hood.
The new Airaid lid uses the stock clips to attach the lid and hold it in place.
With the new Airaid filter installed with the True Flow tube that was already on the project truck before the hood install.

We found out that the Airaid lid was too tall, so we had to cut some of the lid off. Working with Keystone Restyling on the install, they have since made adjustments on all new hoods so that you will not have to cut the Airaid lid.
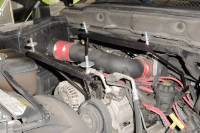
To install the brackets used to hold the shaker section to the engine, you must remove the stock airhat. On this truck, the owner already removed it and had installed a True Flow intake. We utilized the True Flow tube to connect the Airaid lid and filter to the throttle body.
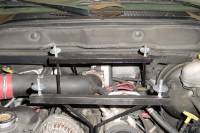
The brackets mount to the mounting brackets that the stock airhat connected to, and a bolt just under the serpentine belt.

Once installed, a nut was screwed half way down on each of the four bolts that stick up to hold the Shaker section, and a washer placed on top.
The bottom section of the shaker is them placed with the four bolts going through the four bolt holes in the bottom section of the shaker.
Once placed on there, the clips to hold the top and bottom section were added, and then the weather stripping to the bottom section.
This shows the bottom side of the shaker once installed, notice the drains and the bolts on the brackets.
The top section of the shaker was then set in place, and the hood was lowered to check clearance. If needed, the nuts on the bracket would be raised and lowered to adjust the height of the shaker.
Once the adjustments were done, the bottom section was tightened with a washer and nut on each of the four bolts, and the top section of the shaker was screwed into the bottom section to hold it in place.
When the shaker was in place, the original grille and hardware was reinstalled on the new hood. On our beta install, we had to increase the size of the holes in the new hood. Again, Keystone Restyling changed their process, and has fixed the new hoods so this will not be a problem.
The team from Custom Design mount the original hardware back on the new hood.

Adjustments were made to align the grille on the new hood.
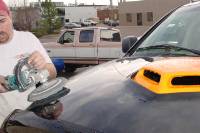
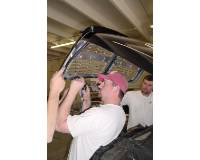
After the install, Royce washed the new hood, and gave it some polish.
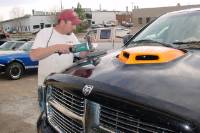
Royce made sure the hood was polished, and that all was fine after the install.
Custom Design then washed the truck, to remove all the residue from drilling the fiberglass.
The paint matched the stock color perfectly.
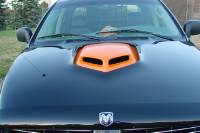
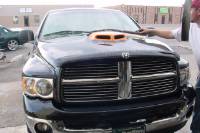
Just look how the Keystone Restyling shaker hood looks after the paint!
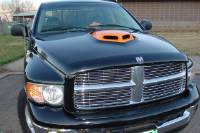
The Keystone hood gives the Hemi Ram the old time look of the 70s Mopar shaker hoods.
The orange paint matches the Bed stripe, and ties in the orange calipers on the Ram.
The Keystone Restyling Shake Hood makes this one great looking Dodge!